"Legends of Gotham City" Custom Figures!
Posted in
Custom WorkstationAfter several years of serious procrastination, I finally joined the 6-inch scale DC Super Heroes Action Figure party!
My plan was to create a “Legends of Gotham City Collection”… An assembly of “definitive” classic BATMAN character action figures… cleanly sculpted, deco’d, detailed and articulated… and (equally important), accurately sized in relation to each other.
In these regards, I didn’t think I was really demanding too much.
And yet, by the end of it all, almost every single character required some kind of custom modification before I was satisfied.
Admittedly, a big part of the issue was the fact that I am very much a “traditionalist” when it comes to THE BATMAN mythology. This pretty much dictated my dissatisfaction with most of the available action figures.
My preferred depictions of the Legends of Gotham City come from the classic pages of Detective Comics and Batman as published by DC Comics from the early 1970’s through the mid 1990’s.
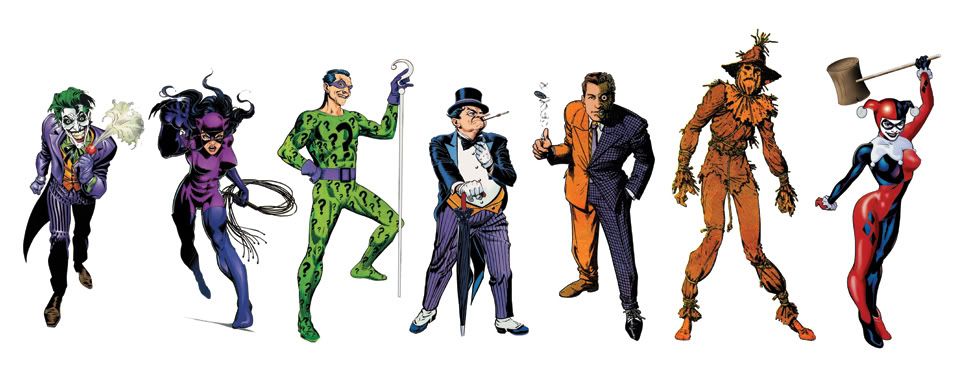
For the most part, Gotham City's nefarious VILLAINS that most interested me (certainly as action figures) were the “classic Rouges Gallery” characters: The Joker, Catwoman, The Riddler, The Penguin, Two- Face, and The Scarecrow. The one exception to that basic rule was Harley Quinn, whom I considered to be a brilliant “modern age” addition to the Gotham lineup.

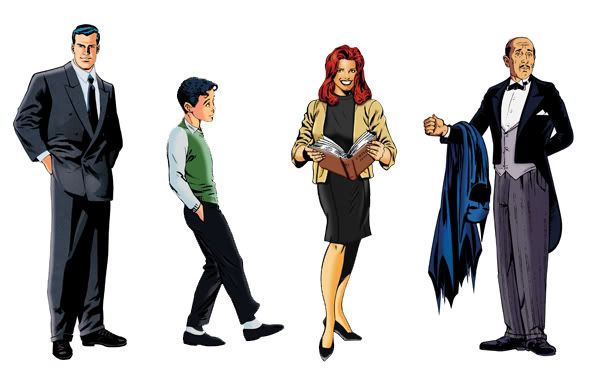
I decided to include a quartet of Gotham City “Secret Identity” characters to the collection (Bruce Wayne, Richard Grayson, Barbara Gordon and Alfred Pennyworth).

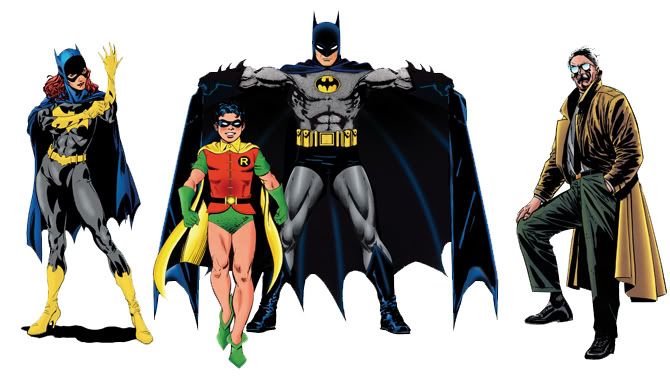
As for action figures of Gotham City's Heroic Guardians, I would focus on Police Commissioner James Gordon, Batgirl, and of course our intrepid Classic Caped Crusaders, The Batman and Robin The Boy Wonder.

The figures of this Legends of Gotham City Collection would depict the comic book versions of these characters since the versions from live-action TV or films, or animation did NOT interest me.
Alright. Let’s get to it. I hope you enjoy my custom Legends of Gotham City Collection…

Please wait...


Looks great Roberto, awesome stuff! Love what you've done with two-face's er... face. Looks way better. You might want to keep an eye on Sithfire's works this year. Rumour has it he'll be taking on The Dark Knight trilogy characters....
On the other side, I decided to paint Two-Face’s hair with vaguely garish streaks of grayish-white… a hair-color duality, while still keeping a neatly combed overall hairstyle in place.
I also mixed a nice flesh-tone base color and gave his acid-burned features a thorough dry-brushing. I did this to move away from the (illogical) solid green color scheme of his damaged flesh, and also to better control a less rigidly straight separation between the damaged and un-damaged sides of his face.
Refusing to use the badly-sculpted, woefully under-sized head sculpt of the DCUC Two-Face figure, I turned my attention to the Secret Origins Two-Face head sculpt, and got right to work re-sculpting it to my tastes. I decided that the first thing he needed was a nice clean hair-cut (on his disfigured side). So… I let my blade to the talking.
With the hair trimmed into a basic shape that I found acceptable, I next began the process of sculpting the fine waves of his combed hair with the edge of my folded sand paper.
I decided to keep the original head/neck articulation so that I would not to have to engineer a different one when this head was transferred over to the new base body. I cut the entire head / neck assembly off of the figure’s shoulders, and trimmed the shirt collar, etc off of the base of the severed neck.
Well… time to get to work!
For no particular reason, I decided to tackle our duality-obsessed, coin-flipping friend from the top of his head and work my way down to his feet.
1) The lower left leg seemed to be warped with an irritating inward bend.
2) The neck position was sculpted with a pronounced forward slump, giving the overall figure an unattractive, lanky, slouch.
And
3) This action figure had one of the most badly under-sized head sculpts I had even seen.
4) The arms and legs were sculpted to be impossibly thin, spindly, and elongated. If the arms and legs of this figure represented the character’s limbs outfitted in loose fitting clothing, then he is most certainly anatomically impossibly thin. The excessive length of the limbs removed any trace of elegance that should be attributed to this character’s style of dress. The arms appeared so long, in fact, that the bare wrists became exposed past the cuff of the jacket almost as if the jacket were ill-fitting. The legs appeared almost like a pair of knobby stalks emerging from the gap of an inadequate pelvis and crotch.
There were simply too many strikes against this body sculpt for it to be useful for my custom figure. A different business suit wearing base figure sculpt would be required.
Long Halloween Two Face: A nicely sculpted, but greatly over-sized / out of scale figure, wearing a very non-traditional “zoot-suit” interpretation of the villain’s outfit. It was sculpted to match Tim Sale’s artwork (which I am not a fan of).
Secret Origins Two-Face: A reasonably well-sculpted action figure, presented in a somewhat compatible scale with the rest of the 6-inch line. This action figure depicted a more traditional version of the character’s appearance. He included some nice accessories, my favorite of which was a tiny “flipped” silver dollar coin caught frozen in mid air! Sadly, I found the body on this figure to be slightly over-sized for my needs (when compared to the other characters of my 6 inch scale collection). So no help there.
However, I did like the well-conceived head sculpt. It featured a generous amount of detail, particularly on the disfigured side of his face. The “evil side” hairstyle selected by the sculptor was the wild, stringy, matted look, (which I do not care for). Additionally, the opposite side un-scathed hair was painted in an incorrect blonde shade, rather than Two-Face’s proper dark brown. However, I was confident that I could correct both of these hair issues easily enough with a blade, sandpaper, and some careful paint work.
When it came to TWO-FACE, my preferred take on the character was (as always), his traditional, classic, comic book outfit. I did, however, find myself employing a generous amount of artistic license when I put this character together as a custom 6-inch scale action figure.
For many years, Two-Face has worn a customized suit that is tan-orange on his right side and pin-striped purple on his left. This basic comic book design (and color combination) is the one I prefer.
I do think, however, that the boundary between the scarred and un-scarred sides of Harvey Dent’s face should be much more random and irregular. It seems that in the comics, in live-action films, and in most licensed merchandising, the boundary between both sides of Harvey’s face has been depicted as a perfectly straight line. This runs contrary to the kind damage that logically would have been caused by an arbitrary splash of corrosive liquid.
Additionally, I fail to see the logic behind the solid green (or sometimes purple) coloring to this acid burn facial damage (as traditionally presented in the comics).
Then there is the matter of hairstyle: Some artists have presented Two-Face with a wild, matted, ruffled, stringy (sometimes strangely-colored) hairstyle along the disfigured side of his head while appearing neatly combed on the opposite side. Other artists have gruesomely depicted all of the hair burned off on the disfigured side of his head, revealing twisted scar tissue along half of his cranium.
While there is certainly validity to either approach, neither one appealed to me.
My preference was for Two-Face to have a reasonably uniform hair style… dark brown on his pristine side, with maybe some prominent streaks of grey running through the scarred side.
I've thought about using my airbrush to paint the basic tones on my figures. And I probably will too. Such a great tool.
So, what's next on your list?
To anyone who is interested, you can check out the finished figure in the gallery:
http://www.figurerealm.com/customfigure ... w&id=33236
Using a reproduction MEGO Batman utility belt, I sliced away the rectangular belt buckle border and painted it gloss black.
I color-matched some purple satin ribbon to the shade of purple of The Riddler’s face mask and gauntlets.
I attached the black painted belt buckle to a section of the purple ribbon, and then dressed the custom figure with the finished garment.
Obviously, The Riddler’s myriad of question mark insignias are what give his zany costume all of it’s character.
Virtually ALL action figure versions of The Riddler create these markings with paint masks and factory spray applications.
I had a different idea.
It always seemed to me that The Riddler’s costume markings were probably applications attached to his tights rather than merely silk-screened or printed graphics. Consequently, I felt that they should be somewhat raised on the surface of the tights. This would also have the benefit of adding more surface detail to the overly-plainly detailed base figure.
To accomplish this, I turned to some very nice black vinyl question mark peel and stick stickers that I purchased (on a whim) from a craft store 10 years ago and saved! They really came in handy here!
With the main painted figure re-assembled, I started the slow (but fun) task of applying the question mark insignias one by one throughout the entire costume.
With the base body painted, I carefully painted the exposed neck scoop area in flesh tone.
Using micro-thin hobby styrene strips, I followed the original collar edge paint indication and laid down a new raised edge detail. To my eye, it is the addition of details like this that move this sculpt away from the animated style and bring it closer to the comic book style.
I decided pretty early on that I wanted the costume on my custom Riddler action figure to be colored in a more vibrant green than initially provided by either DC Direct or Mattel’s DC Universe Classics.
Naturally, that meant a tediously extensive process of prepping the figure for full re-paint. The arms and gauntlets were dismantled off of the figure for clean prep and separate paint treatment. I wet sanded the action figure (with 240 grit sand paper and 91% isopropyl alcohol to simultaneously strip the factory paint and prep the surface for repaint. The procedure was slow and deliberate, requiring 2 full days of sanding by hand. Use of laquer thinner or “Goof-Off” remover is typically NOT a paint-stripping option for me when action figure customizing since I am VERY allergic to the fumes, and both products tend to actually melt any plastic they come into contact with.
Let us now resume our look into his creation...
Hard to pick a favourite, I love 'em all so far! But then again, that's the idea right? They're all connected to each other and by that they do form a unit of some sort.
Great work my friend!
I loved the DCUC Riddler head sculpt, but I was a bit dissatisfied with the rear neck hair line. It looked to me that the hair line had an abruptly short cut-off, with a very un-natural, blunt looking shape. The figure’s internal head / neck ball articulation pin was even partially exposed because of this problem. I felt that I was going to have to extend the rear hair line lower and shape it into a contour that made sense.
In order to accomplish this hair line extension, I retrieved a DC Direct Deadman head sculpt from my parts bin, and carefully sliced out a section of his rear hair line. I attached this new appliance to the rear of The Riddler head sculpt and shaped its contour with a razor blade. Using white squadron putty, I filled the seam between the two parts, and sculpted new waves of hair to blend seamlessly with the existing sculpt.
I then cut a section of the “Detective” Riddler’s gauntlet that included the swivel pin and very carefully shaped it into a makeshift “cork” that would fit into the cavity of my new gauntlets.
With the new swivel socket plug glued permanently in place, I worked the edges a bit with sandpaper to shape its contour cleanly to match the circumference shape of the custom figure’s forearm.
In the past whenever I have tried to add articulation where it did not previously exist, I have generally disliked attempting to engineer working articulation from scratch since the moving parts tend not to have a nice tight factory fit that allows for SMOOTH swivel/pivot/roll/ etc. I decided to kit-bash the swivel wrist articulation parts from an action figure that already contained them to avoid this problem.
The DC Direct “Detective Comics” Riddler figure came in very handy here. That figure was equipped with a nice, tight, simple, swivel gauntlet articulation, with a very effective pin and socket configuration.
I cut both (inarticulate) “hybrid” gauntlets off of the custom figure’s arms and amused myself when I compared their sleek size and shape to the virtual baseball mitts from the DC Direct “Detective” Riddler figure.
To begin my articulation kit-bash, I Dremelled an open cavity into each forearm stump of my custom figure.
Then, using the “Detective” Riddler figure, I cut away a section of his arm stump containing the socket for his gauntlet articulation.