 | Hello Guest - Sign In or New Account |
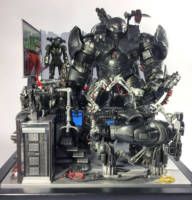
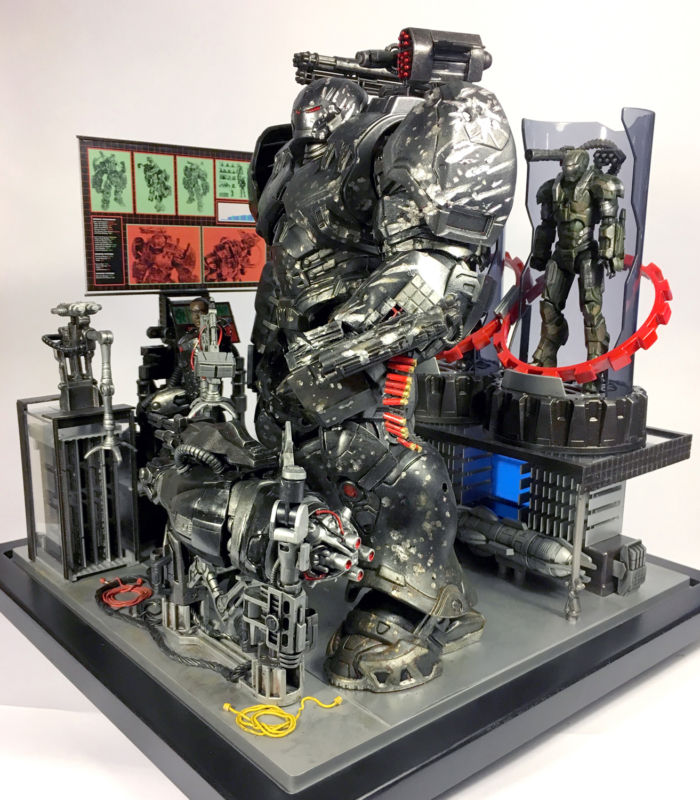
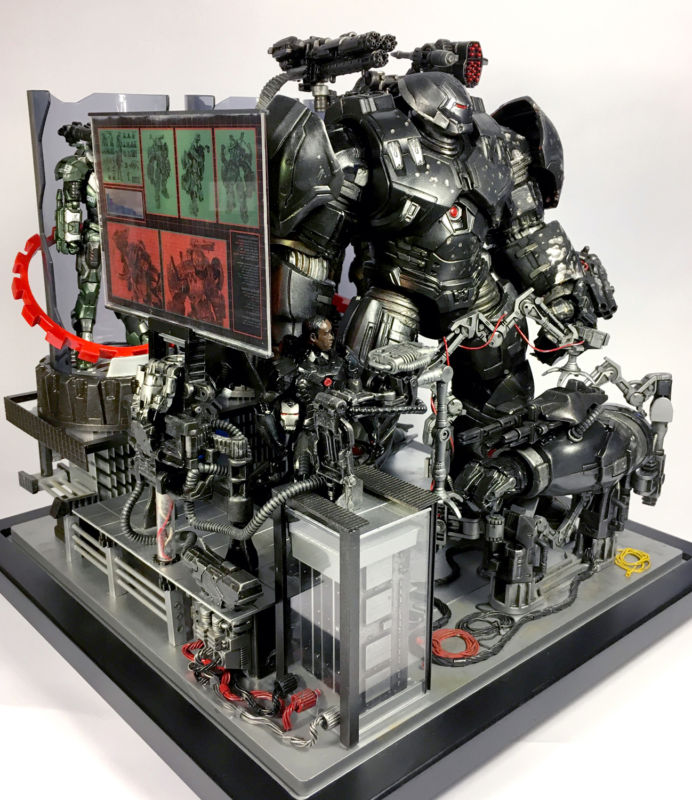
The idea for the War Buster Project started way back when I was working on the Mechanic’s Garage. In the midst of that project I had acquired the Stark Tech Captain America Assault Armor and thought that it would be cool to have a companion display featuring Col. James Rhodes and his armors. Just by looking at the Cap Assault Armor, I could tell that it was originally intended to be a War Machine and after doing some research, found this to be true. All it needed was a repaint and some slight modifications to be what it was supposed to be. When the “Garage” was going through it’s metamorphosis, as has been documented earlier, I had to also re-think the idea for and design of the War Machine Project. The biggest change for both projects came with the acquisition of Hasbro’s BAF Hulkbuster. Having this figure as the centerpiece of the “Garage” meant I had to also step up Rhodey’s game. What this ultimately meant was that I ended up forking over the cash for another Hulkbuster. Ouch! By the time I finally got to the point where I could start this War Buster Project, I had accumulated all the necessary parts and components to begin this build. The original vision was to have both the Stark Tech Assault Armor AND the War Buster in the war room but due to the size constraints of the display case, the Assault Armor had to go. I was disappointed because the scale of the two figures would have presented a very interesting visual contrast. Here’s the recipe: WAR BUSTER I started by disassembling the Hulkbuster and giving it a coat of semi-gloss black paint with black chrome accents. The first bit of customizing was done on the forearms to prepare them to receive the four barrel cannons. Next was the construction of the triple mini-gun and missile pack ordinance mount. The majority of pieces for this module came from various Transformers and some fodder bin parts. The final stage of this build was rendering the various degrees battle damage inflicted upon this armor. My idea was to make it appear as if it had been hit by a fusillade of heavy fire on the front left quarter and sustaining but surviving severe damage. COL. JAMES RHODES I had first selected the 2013 Marvel Universe Black “Zero Gravity” Iron Man suit for Rhodes but found that the head sculpt was too large for that figure. I dug through my spare figure bin and found a Hypervelocity Armor that scaled better with the head sculpt and looked great with that very angular design. I painted Rhodey’s head the best I could then painted the suit black with steel and gun metal accents. I added a custom Arc Reactor and re-purposed Jet Pack from the Assemblers Exosphere figure then finished it up with some highlighting and weathering. THE ARMOR WALL The War Machines used for the Armor Wall were the Exclusive Iron Man 2 Proving Ground and Advanced Tactical Armor and the Iron Man Armored Avenger Artillery Armor. Not much modifications were done here just a custom armament package on the Artillery Armor and some weathering. THE WAR ROOM The War Room is built on the Collector’s Museum 10”x10”x10” display case with the main structural components being a variety of Plastruct sheet plastic, structural shapes and old computer parts. The fodder bin provided much of the detailing pieces along with lead soldering wire and some plastic tubing. For the armor platforms I used three Hasbro Iron Man 2 Light-Up Hall of Armor bases. These were disassembled, repainted and reconfigured to make them fit into the allotted space. The display panels were created in Photoshop using photos I had taken of the actual War Buster figure and a screen design I created with damage control readouts on a grid pattern layout. It was then printed on a color zerox transparency in various sizes for multiple placement around the War Room. The rest of it was done with some precious down time, the devils playthings and a lot of wine. Here’s the ingredients: • Tamiya acrylics • Tamiya Weather Master Kits • Rub-N-Buff Silver • Kiwi Black Touch-Up Shoe Polish • Tamiya Liquid Model Cement • Rust-oleum Spray Paint • A Spool of Saudering Lead • Miscellaneous Wires • Super Glue • Hasbro 3.75 War Machine Figures • Hasbro BAF Hulkbuster • Various Plastruct Sheets & Structural Pieces • Computer Processor Heat Sinks • Old Laptop Ram Chips • Fodder Bin Parts This diorama is the 10th attempt at rendering my vision in three dimensions going back to 1974. Even though I’ve only made a handful of these, my goal in creating each one of them is to invite the viewer to participate in the story I’m telling. I like to think of it as a preface to a book or novel that the reader, or in this case, the viewer, can finish in their own way. If I have done a proper job of it, then the viewer will see beyond any technical skill or thought processes and look at these characters and see a life being lived and a story being told. These snapshots of an instant in time that I present to the viewer will, hopefully, let them to continue the story in their own way and bring it to their own conclusions. The variations and possibilities of which, are endless.  |
| Pirates of Dark Water - Ren |  | Submission Order |  | Dutch vs Predator - version 2 |
| Iron Man (Classic Comic/Cartoon) | | Iron Man Series | | IronMan Mark II |
| "Deadlier Than The Male" | | Created by Jinyei | | The Kill Zone |

 Update Your Custom
![Rhodey's War Room (Iron Man) Custom Diorama / Playset [Rhodey's War Room]](userimages/customs/97000/thumb_96930-2-5b563203ea025.jpg)
![Rhodey's War Room (Iron Man) Custom Diorama / Playset [Rhodey's War Room]](userimages/customs/97000/thumb_96930-3-5b563244e3a23.jpg)
![Rhodey's War Room (Iron Man) Custom Diorama / Playset [Rhodey's Empty War Room]](userimages/customs/97000/thumb_96930-4-5b56330576ab7.jpg)
-revoltech1